
Remove Whitespace and Borders from Visio PDFs for Publication-Ready Figures
If you’re just starting out in research and trying to generate high-quality figures for your paper, I want you to know—I’ve been exactly where you are. Early in my PhD, I struggled to create satisfactory visuals using Microsoft Visio. The figures looked fine on-screen, but once I exported them to PDF for LaTeX, they either had too much whitespace or an ugly black border.
This post is a guide for you—and the version of me from a few years ago—on how to export clean, high-quality vector graphics from Visio for research publications.
Why Vector Graphics Matter in Research
You’ve probably noticed that images can be split into two main types:
- Raster graphics like JPEG or PNG, which are pixel-based
- Vector graphics, which are resolution-independent and scale perfectly at any zoom level
For research manuscripts, vector graphics are always preferred. Formats like PDF, SVG, or EPS preserve detail and clarity.
When I began writing my first PhD paper, I decided to export all figures in PDF format for three reasons:
- PDF files open easily on any machine without needing extra software
- LaTeX handles PDF images natively
- The quality remains crisp no matter how much you zoom in
But… exporting PDFs from Visio introduced two major issues:
- Extra white space around the figure
- An unwanted black border
After several frustrating attempts, I finally figured it out.
✅ Fixing the White Space and Borders in Visio PDF Export
Here’s the exact step-by-step solution that works reliably.
1. Remove Extra Space Around the Figure
You want the drawing area to hug your content closely:
- Go to Design → Size → Fit to Drawing This ensures there’s no unnecessary padding around your diagram.
2. Eliminate White Borders
This part is a little hidden. You’ll need to enable Developer Tools:
- Go to Options → Customize Ribbon
- Check Developer to add it to your menu
- Click Developer → Show ShapeSheet
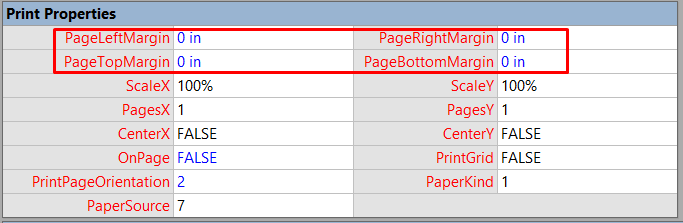
- Under Print Properties, set:
PageLeftMargin,PageRightMargin,PageTopMargin,PageBottomMarginto 0**
- Go back to Design → Size → Fit to Drawing
 Now your drawing will tightly fit the content, with no awkward white border.
3. Export Without the Black Border
Another sneaky setting:
- Go to Export → PDF → Options
- Uncheck the option:
Document structure tags for accessibility - Choose:
Current page onlyand do not include background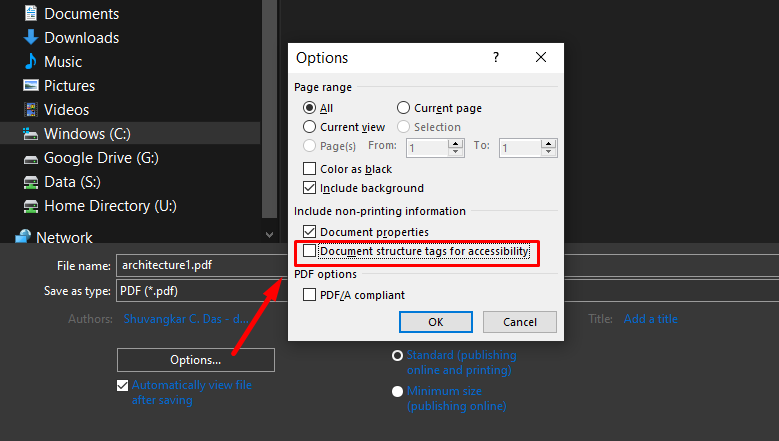 Save the file.
🧪 Sample LaTeX Code to Add the Figure
Here’s the code I used to insert the cleaned-up Visio figure into my LaTeX manuscript:
\begin{figure}
    \centering
    \includegraphics{graphic.pdf}
    \caption{Your figure caption}
    \label{fig:graphic}
\end{figure}
Done. Your figure will now look professional—clean, crisp, and borderless.
Final Thoughts
I searched for this solution longer than I’d like to admit. So if you’re struggling with exporting publication-ready figures from Visio, I hope this helps you save time and frustration.
👋 About Me
Hi, I’m Shuvangkar Das, a power systems researcher with a Ph.D. in Electrical Engineering from Clarkson University. I work at the intersection of power electronics, DER, IBR, and AI — building greener, smarter, and more stable grids. Currently, I’m a Research Engineer at EPRI (though everything I share here reflects my personal experience, not my employer’s views).
Over the years, I’ve worked on real-world projects involving large scale EMT simulation and firmware development for grid-forming and grid following inverter and reinforcement learning (RL). I also publish technical content and share hands-on insights with the goal of making complex ideas accessible to engineers and researchers.
📺 Subscribe to my YouTube channel, where I share tutorials, code walk-throughs, and research productivity tips.
Connect with me:
📚References
[[Visio Export Figure For Paper]]
Leave a comment