
Tips For Sampling High Speed Analog Signal In Arduino
It was 2013. I was doing my undergraduate at the Bangladesh University of Engineering and Technology(BUET). I had a power system course along with a lab course in my second year. I had to develop a hardware project on a power factor improvement plant as the requirement of the lab course. I was very excited about the project as it was my first hardware project as in undergraduate. The very next day I bought a bunch of components for the project. Potential transformer(PT), Current Transformer(PT), ATmega microcontroller, and many discrete components. I eagerly started experimenting with the sensors. As I had the experience of working with microcontrollers beforehand, I started everything smoothly.
The next day, I started my experiment by sampling a 50Hz sine wave and then transferring the signal into the PC through serial. My main goal was to visualize the 50Hz signal before measuring the current, voltage, and power factor. But unfortunately, I did not see the sine was as expected. Instead, it was like noise. I looked into the connections and code again and again, but could not figure out any potential flaws.
A few days later, looking into different blogs, I figured out the mistakes I was doing while sampling the signal. Later, I found that everyone does the same mistakes although it is easy to understand. The purpose of this blog is to explain common mistakes we do, while sampling analog signals and how to avoid them.
Common mistake in sampling analog signal using ADC
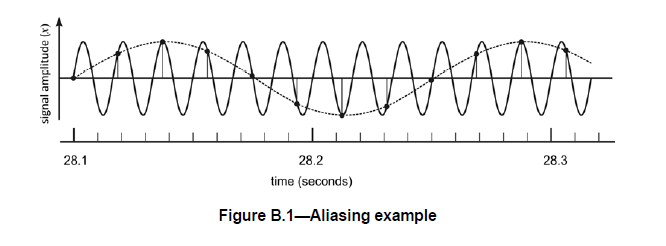
I was sampling the 50Hs sine wave and sending the signal through serial communication. That was a very bad idea of sampling analog signals. I have also seen people working with kilo-hertz level signals and trying to visualize the signal in this way. The reason for getting a noisy signal instead of a sine wave because of delay due to the serial printing. This phenomenon is known as aliasing. The figure below is an example of aliasing. A solid high-frequency signal is my main signal to sample. Due to Serial printing, the sampling rate is low. As a result, I am getting the sample like the dotted signal.
Consider the baud rate of serial communication is 9600 bits per second. If you want to send a single byte like character ‘X’ to the PC, it takes around 1ms for a 9600 baud rat. Here are 8 data bits, 1 start bit, and 1 stop bit. So comprises 10 bits including overhead for sending each byte of data. Therefore, 10 bits take around 1ms. That’s why it is not a good idea to print analog values just after sampling.
The same thing happens for people working with Line following robots or working with a robotic project for the first time. After reading the analog signal, they print a lot of serial logs into the terminal and expect everything will work fine. So it is very important to remember how to use serial printing in time-critical code.
How to avoid anti-aliasing in Arduino
📩 Enjoying this walkthrough?
I share one practical story like this each week—straight from real projects, with lessons you can apply.
No spam. Just insights.
One of the easiest tricks, I applied here, was to use a buffer for reading the samples and then process the signal from the buffer. So the steps are as follows.
- A buffer to hold all of your analog values. Such an array of 100 value int.
- Read the analog value in a for loop and fill up the whole buffer of 100 integers.
- Then create another for loop for printing out all of your data from the buffer
In this way, you can sample signals at a higher speed in the range of 8KHz which is the sampling frequency of Arduino Uno. Here is the example code that I explained so far. I
//Take a buffer so that you can store your sample in the buffer
int analogBuffer[500];
void setup()
{
  Serial.begin(9600);
}
void loop()
{
  //First save the sample in a buffer using loop.
 // Do not do other task during sampling
  for(int i = 0; i<500; i++)
  {
    analogBuffer[i] = analogRead(A0);
  }
  //After taking sample do whatever you want to do with the sample
  //Print or postprocess anything
  for( int i = 0 ; i<500; i++)
  {
    Serial.println(analogBuffer[i]);
  }
//  int sensorValue = analogRead(A0);
//  Serial.println(sensorValue);
}
I have also made a video on the topic on my YouTube channel. You find the video in the link here.I hope the blog will help. Happy coding!!
Real stories. Practical lessons. Right in your inbox.
No spam—just once a week.
👋 About Me
Hi, I’m Shuvangkar Das — a power systems researcher with a Ph.D. in Electrical Engineering, currently working as a Research Engineer at EPRI. I work at the intersection of power electronics, inverter-based DERs (IBRs), and AI to help build smarter, greener, and more stable electric grids.
My work spans large-scale EMT simulations, firmware development, reinforcement learning, and hardware prototyping. Beyond engineering, I’m also a YouTuber and content creator — sharing hands-on insights on productivity, research, and knowledge management. My goal is simple: to make complex ideas more accessible and actionable for everyone.
Connect with me:
📚 Obsidian Notes I Used for This Blog
Shuvangkar Das, Potsdam, New York
Leave a comment